This post contains affiliate links. If you buy something through one of my links, I may earn a small commission at no extra cost to you. I only recommend products I’d actually use myself. Full details on the affiliate disclosure page.
Studios don’t come with bonus corners. There’s no architectural nook waiting for a cushion. The place where you want to read is already your bedroom, your desk, or your couch. So when I say you can still carve out a reading nook, I mean you build the feeling of one. The architecture isn’t going to help.
Below: four setups that actually work in real small spaces. Each one starts with the space constraint you have, not the one you wish you had. Each uses furniture, not renovation. Every setup has a no-drill, no-damage version for renters, because most of us are.
Total cost per setup lands between about $45 for the window ledge and around $500 for the full armchair corner. Nothing on this list requires a landlord conversation.
What makes a reading nook work in a small space
Four things have to be true before any of the setups below start working. Skip these and you’ll end up with a chair nobody sits in.
It needs to be a place, not a mood. A specific chair, cushion, or ledge your brain learns to associate with reading. If the reading happens on a different surface every night, the nook doesn’t exist yet.
Light from one direction, not overhead. Ceiling bulbs wash out the space and make it feel like a hallway. A single warm lamp (2700K) at shoulder height changes the temperature of the corner completely.
Your current book has to be within arm’s reach. If you get up to find it, the nook isn’t working. A small shelf, a basket, a side table, or the arm of the chair. One of them, not none.
One soft surface between you and the apartment. A throw, a seat cushion, a rug under the chair. The fabric is what tells your brain this zone is separate from everything else in the room.
Setup 1: The Dining Chair Nook
For studios where every chair already has a job. The trick is promoting one dining chair to reading-chair status without losing it from the table. Pick the chair farthest from the door (less foot traffic), pull it 2 to 3 feet closer to a lamp, and add a thick cushion with ties. Total footprint: about 24 by 24 inches of floor. When company comes, the chair slides back to the table and the nook disappears on its own.
The cushion matters more than the chair. A dining chair seat is designed for 45-minute meals, not two-hour reading sessions. You want at least 4 inches of memory foam between you and the wood before your back starts to complain.
The downluxe Indoor Chair Cushions come as a 4-pack, which sounds like too many until you realize cushioning only one chair makes the dining set look like one got an upgrade everyone else missed. Four inches of memory foam is the minimum I’d accept for a dining chair that’s now expected to hold you for two hours. The ties keep them put on flat or gently-dished seats. See the downluxe cushion 4-pack on Amazon
Dimensions: 15.5″ W × 15.5″ D × 4″ H · 4-pack · memory foam with ties
Not for: dining chair seats under 14 inches wide, or sharply curved seats.
Renter-Friendly Alternative
The cushion ties attach to the chair, so no hardware is needed. The lamp is the variable. If the closest outlet is more than 6 feet from the chair, route a slim extension cord along the baseboard with adhesive cable clips (not the tape-on kind). Clips come off cleanly and the cord stays invisible along the floor instead of crossing the room mid-wall.
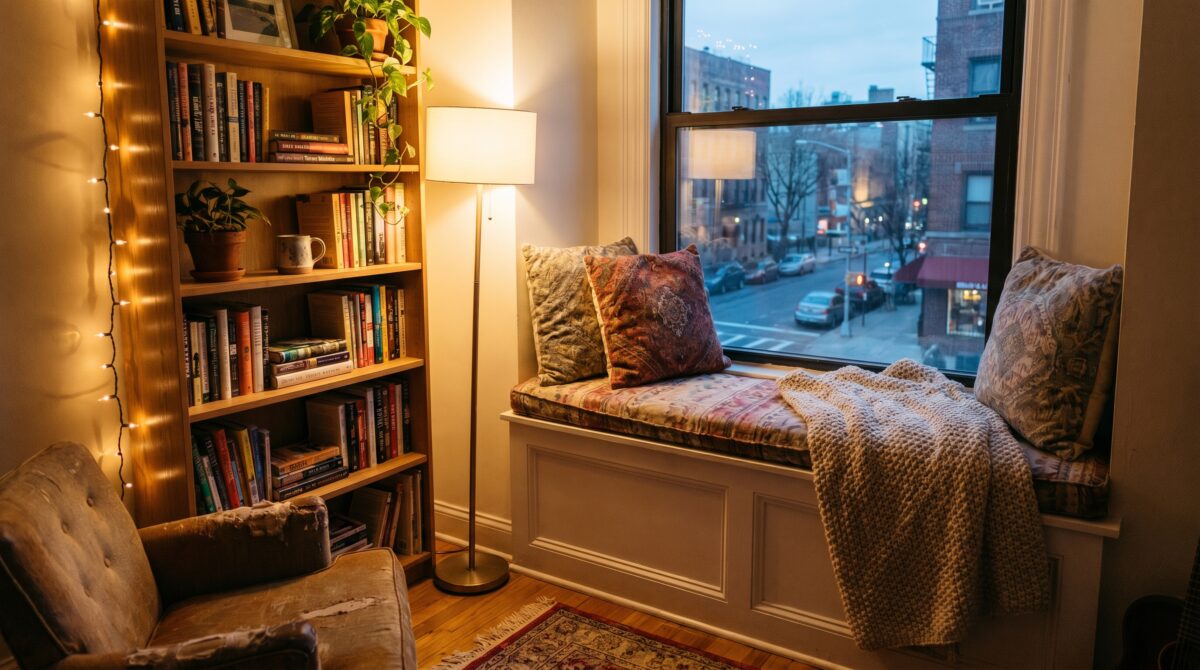
Setup 2: The Window Ledge Nook
If your studio has a window ledge 14 inches or deeper, you already have a reading bench. Most renters don’t realize this because the ledge usually holds plants or nothing. Clear it, measure it, and put a cushion on it. Minimum usable depth is 14 inches. Below that, you slide off within 5 minutes. Between 14 and 20 inches is bench territory. Above 20 is a full window seat.
Curtains matter more than you’d think. A reading spot right up against the window gets cold in winter and hot in afternoon sun. A tension-rod curtain rod and two panels of heavy linen solve both problems without drilling a single hole.
The ROFIEJOX 48-Inch Bench Cushion is the size most apartment window ledges land close to, and the 4-inch thickness is the difference between sitting on a ledge and actually relaxing on one. The non-slip bottom keeps it put without hook-and-loop strips, which matters if the ledge is a painted wood sill that might chip. I still pull it up every few weeks to vacuum underneath, because dust collects fast under any window cushion. See the ROFIEJOX window bench cushion on Amazon
Dimensions: 48″ W × 16″ D × 4″ H · non-slip bottom · polyester brushed fabric
Not for: window ledges under 48 inches wide (overhangs awkwardly) or under 14 inches deep (no cushion fixes a too-shallow ledge).
Setup 3: The Corner Chair Setup
The reading nook most people picture when they hear the phrase. An actual chair, a small table, a lamp, a corner. This works in studios of 400 square feet and up, and in one-bedroom apartments where one living room corner is dedicated to the chair. The chair’s width is the whole game. Any corner in a typical apartment is roughly 30 to 36 inches between the nearest two walls. Above 32 inches of chair and the arms start crushing drywall on both sides, leaving no room for a throw draped over one arm. Under 28 inches and the chair looks lost in its own corner.
A second critical measurement: 12 inches of clearance from the chair arm to the nearest piece of furniture. That’s the minimum to add a throw pillow and still swing the chair slightly when you sit down. Less than 12 and the chair feels wedged, which is where most of the “I bought a chair and hate it” stories start. For the right chair and side table, my pick and the shop-the-look companion to our apartment-sized sofa roundup:
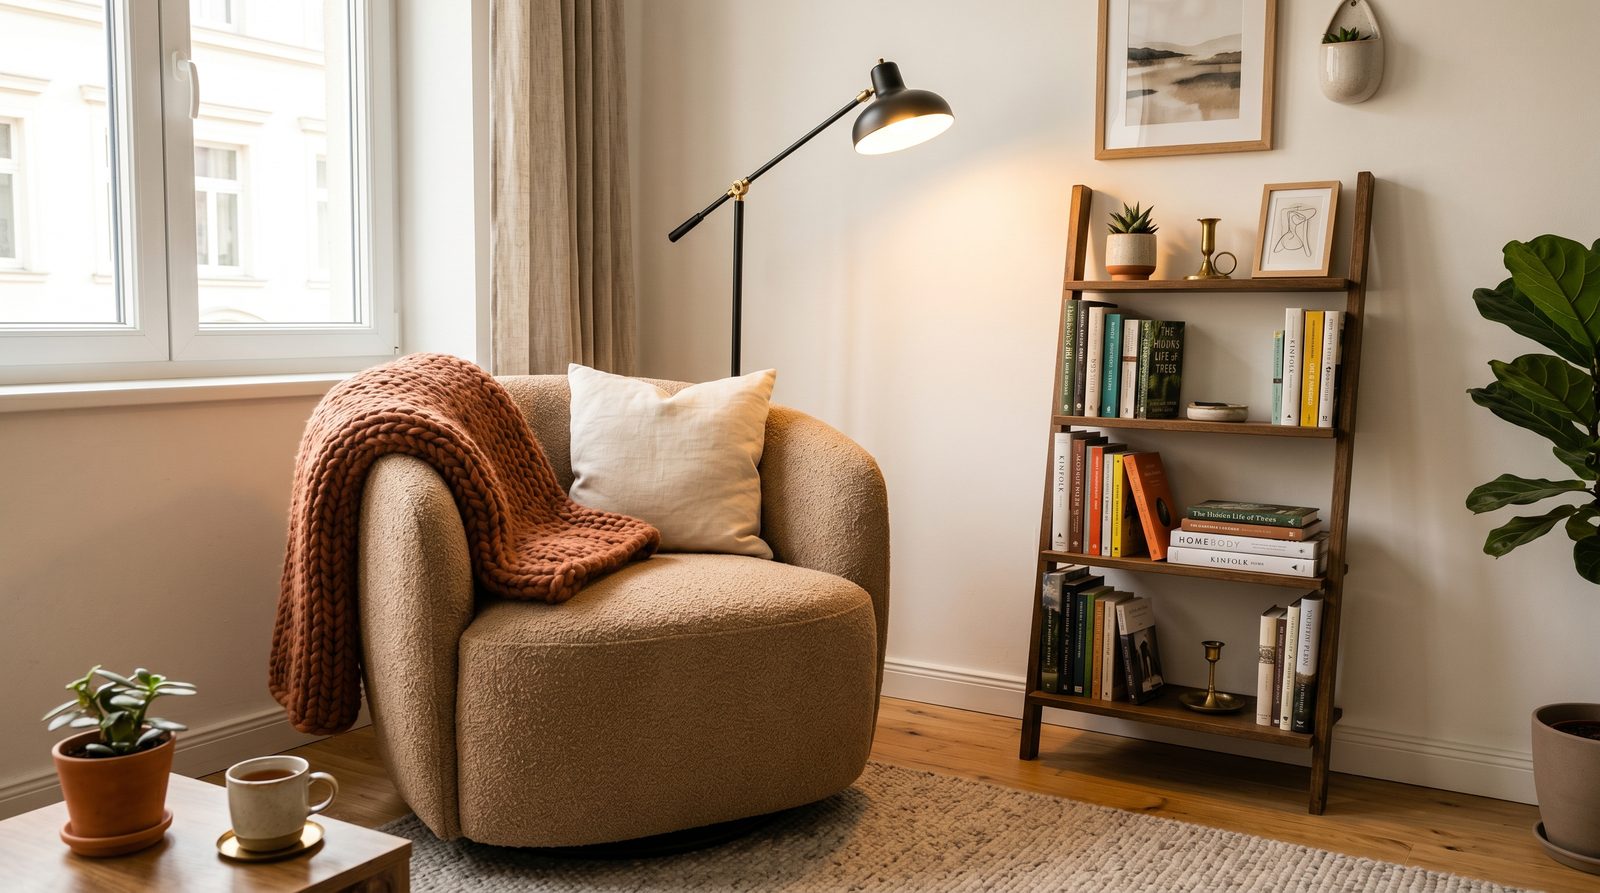
The FiveWillowise Swivel Barrel Armchair is the one I keep coming back to for this setup. Thirty inches wide is the upper limit of what fits cleanly into an apartment corner without the arms touching both walls, and the swivel is the feature I didn’t know mattered until I had it. Morning: face the window. Evening: swivel 90 degrees toward the lamp. Same chair, two different nooks, zero rearranging. See the FiveWillowise swivel armchair on Amazon
Dimensions: 30″ W × 30″ D × 31″ H · 46 lbs · swivel base · upholstered
Not for: corners under 32 inches wide, or anyone who wants a firm chair to work from. This one leans back.
For the side table, skip anything with a full base footprint. A C-shaped table clears the constraint by design: the surface floats over your lap while the legs tuck under the chair. The QEEIG Narrow C-Shaped Side Table (set of 2) is 7 inches wide, 15.7 inches deep, and holds 20 lbs per table. The second one in the set gives you a matching surface on the other side of the chair, or you can relocate it to the bedside for a second reading spot.
Renter-Friendly Alternative
Don’t drill anything for this corner. A plug-in wall sconce mounted with 3M Command large picture-hanging strips (rated for 7.5 lbs together, per 3M’s own specs) stays up reliably for the length of a lease and comes off without paint damage. For vertical book storage near the chair, skip floating shelves entirely. A narrow leaning ladder bookshelf puts all the weight on the floor and requires zero hardware, which is the only shelf type I fully trust in a rental.
Setup 4: The Foot-of-Bed Nook
For small bedrooms where the living room isn’t an option and the only available square footage is between the foot of the bed and the opposite wall. This setup needs 24 to 30 inches of clearance between the bed and the wall, which is roughly a 10-by-12-foot bedroom minimum. The tension: a reading chair, slim enough to leave a walkway past the bed. A 30-inch armchair won’t fit here. A narrow side chair or a floor cushion setup will.
The lamp is more constrained than the chair. A floor lamp with an arc base eats 12 to 18 inches of clearance you don’t have. A plug-in wall sconce mounted above or beside the chair lights the page without touching the floor. The cord runs down the wall behind the headboard to a baseboard outlet. For this specific constraint, I use plug-in sconces every time.
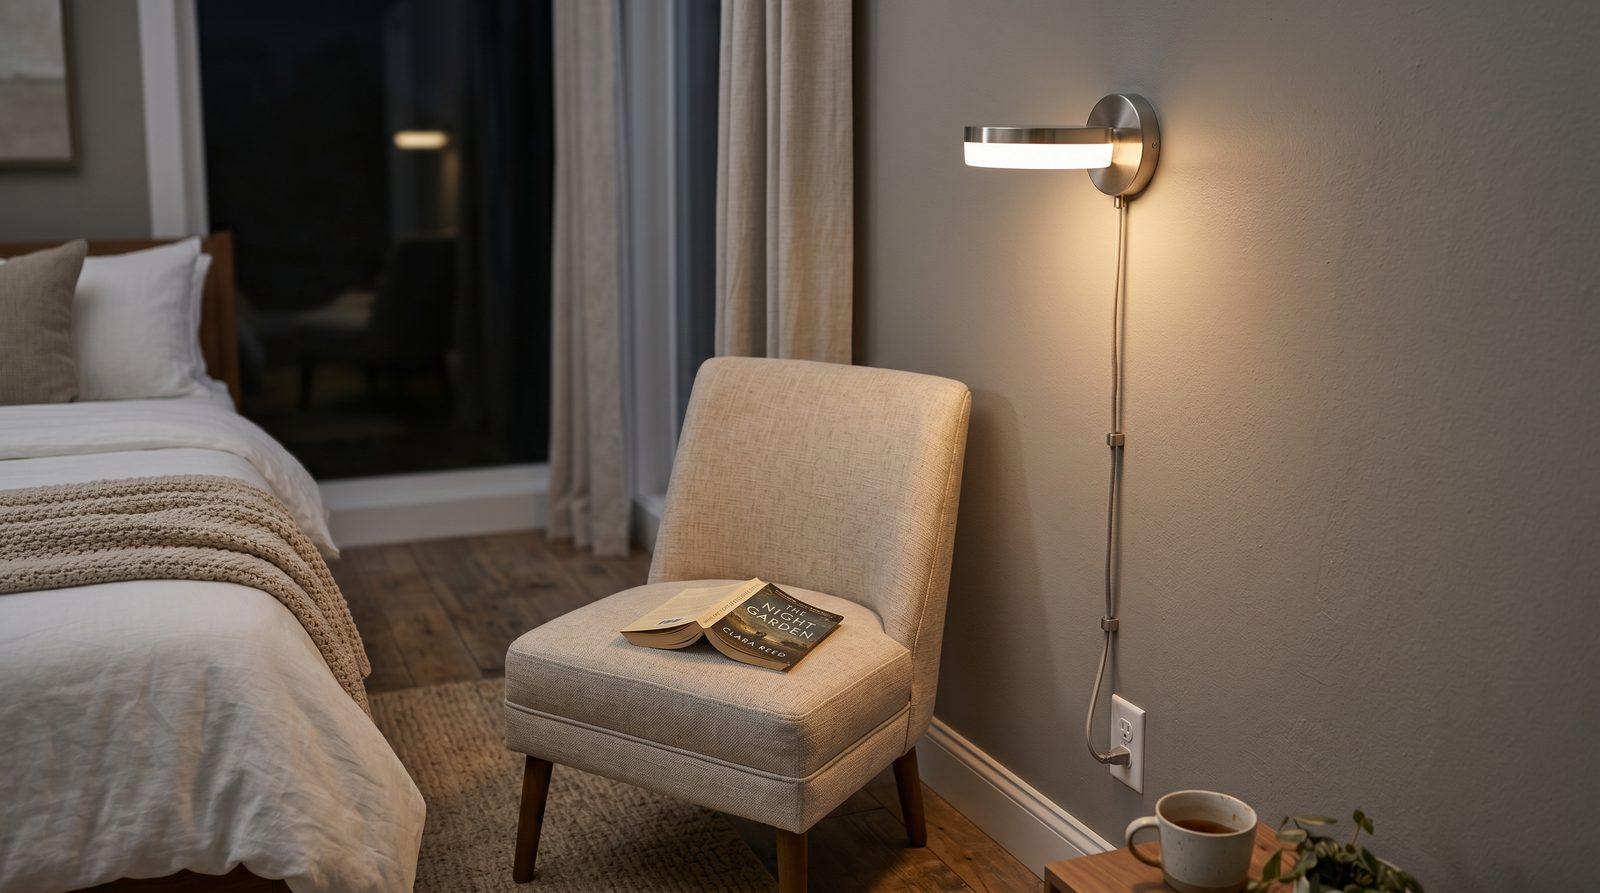
The Galtlap Plug-in Wall Sconce (set of 2) is the sconce I recommend any time the floor is already claimed. The USB ports are the detail that makes it actually useful next to a bed: your phone charges while you read, no second outlet adapter. The in-cord dimmer lets you bring the light down to candle-level without getting up, which matters when the bed is 4 feet away and you’re ready to sleep. See the Galtlap plug-in sconce set on Amazon
Cord: 6 ft · dimmable · 2 USB charging ports · pack of 2 · brushed nickel
Not for: no outlet within 6 feet of the intended mount. Don’t solve that with an extension cord behind a headboard.
Renter-Friendly Alternative
The sconce ships with drywall screws. Skip them if you’re renting. Two 3M Command large picture-hanging strips (rated for 7.5 lbs together) hold a sconce that weighs under 2 lbs with plenty of margin. Peel the strips off flat on move-out day and the wall stays unmarked. I’ve used this exact mount on three different rentals and never lost a sconce or a deposit.
Common mistakes that make small reading nooks feel cramped
Using the overhead light as the reading light. The difference between a reading nook and a hallway is almost entirely the lighting angle. One bulb overhead means neither. A lamp at shoulder height with a warm bulb (2700K) and the shade within 3 feet of the book is the minimum for cozy.
Putting the chair 6+ feet from the nearest outlet. You’ll use an extension cord for the first week, give up on the lamp by week three, then stop using the nook by month two. If you can’t solve the outlet-to-chair distance with a single 6-foot cord hugging the baseboard, move the chair closer to the outlet before accepting defeat.
Buying a chair that’s wider than the corner. Wall pressure on the arms kills the option of draping a throw and makes the whole corner feel squeezed. If the corner is 32 inches wide, the chair has to be 28 or under to leave any breathing room. Do the measuring before the buying.
Skipping the side surface. A nook with nowhere to put the cup of tea, the reading glasses, or the phone becomes a nook where you use the floor. Once the floor is the side surface, the zone stops feeling separate from the rest of the apartment, and the nook collapses back into just-part-of-the-room. A side surface is not optional.
Frequently Asked Questions
What’s the minimum space I need for a reading nook in a studio apartment?
A 4-by-4-foot patch of floor is enough. That fits a 30-inch-wide chair, a slim side table, and a lamp with about 6 inches of clearance on each side. Below 4 by 4, switch to the window ledge or dining chair setup instead.
Do I need a dedicated chair, or can I use what I already own?
Use what you own for the first month. If you find yourself actually reading there, upgrade the chair. If you don’t, the nook isn’t working and buying a new chair won’t fix it. The cheapest real version is a dining chair plus a 4-inch cushion for about $45.
What kind of lighting works best for reading in a small space?
A warm 2700K bulb in a floor lamp, a plug-in wall sconce, or a table lamp placed behind and slightly to the side of the chair. Overhead ceiling lights wash the space out and make it feel like a hallway. A dimmer switch matters more than you’d think.
How do I make a reading nook in a rental without drilling into the wall?
Use a freestanding floor lamp or a plug-in wall sconce mounted with 3M Command strips. Replace floating shelves with a narrow leaning ladder bookshelf. If you want wall texture or color, peel-and-stick wallpaper removes cleanly. Every setup in this post has a no-drill version.
How much should I budget for a full reading nook setup?
Between $45 and $500 depending on the setup. Dining chair nook is about $45 (cushion only, reusing an existing chair). Window ledge nook is $50 to $70 (cushion plus a tension-rod curtain). Corner chair setup is $400 to $500 (chair, C-table, sconce, bulb). Foot-of-bed nook is $80 to $150 (sconce set plus a throw).